


A task flow diagram is a vital tool for maintaining consistency throughout a project. By following a well-structured task flow, businesses can ensure smooth operations, minimize disruptions, and achieve their project goals more efficiently. For startups, where precision and efficiency are critical, a task flow diagram serves as the foundation for successful project management.
Before diving into the creation of a task flow diagram, it’s essential to grasp the key components that contribute to maximum efficiency. Identifying potential issues and delays early in the process can significantly reduce risks and enhance overall productivity.
At Devoner, we leverage task flow diagrams to ensure our projects are executed seamlessly. We recognize that startups require strict adherence to processes, as even minor errors can have long-term repercussions. Our commitment to precision empowers our clients with the confidence that every partnership is managed with meticulous care.
In this blog post, we explore how startups can strategically implement task flow diagrams to optimize workflow and set themselves up for success in 2024.
What is a Task Flow Diagram?
A task flow diagram is a visual representation of the steps required to complete a project successfully. Think of it as a project roadmap that highlights potential risks or delays, while also enhancing the overall user experience.
The diagram ensures the “flow” of a project remains smooth, providing clarity on how each task transitions from one phase to the next. This visualization helps teams better understand the project as a whole and identify areas that need attention.
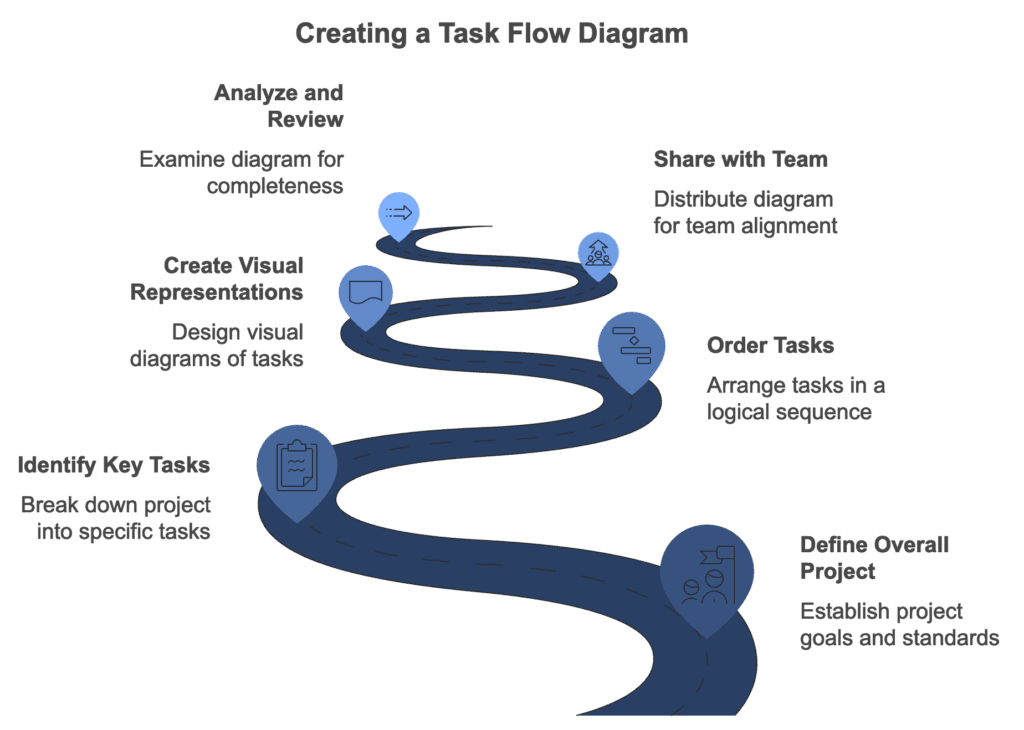
How to Create a Task Flow Diagram
Creating an effective task flow diagram involves several key steps to ensure all components align with the project’s goals. Here’s a step-by-step guide to making the most of your task flow diagram:
- Define the Overall Project
- The task flow diagram helps maintain consistency across all assignments, maximizing workflow potential and efficiency. Start by clearly defining the project’s goals, objectives, quality standards, and deadlines.
- Identify Key Tasks and Steps
- Break down the project into key actions or steps. Ensure each task has a specific goal before moving on to the next step in the diagram. This approach prevents unnecessary backtracking and improves overall workflow efficiency.
- Order Tasks According to Relationships
- Task flow diagrams are designed to create a consistent flow throughout the project. Determine how each task complements the others and establish a clear order of execution.
- Create Visual Representations
- Use flowchart designs or diagramming tools to create visual representations of the tasks. Symbols, shapes, and lines should be easy to follow, ensuring every team member can navigate the diagram effectively.
- Share with the Team
- Share the task flow diagram with your team to ensure everyone is aligned with the project’s goals. Encourage feedback and insights to improve the diagram’s effectiveness.
- Analyze and Review
- Conduct a thorough analysis of the diagram to ensure all tasks, dependencies, and potential bottlenecks are accounted for. Testing the diagram can help identify and address issues before they impact the project.
- Actively Address and Update the Diagram
- Continuously monitor the project’s progress and update the task flow diagram as needed. Effective communication and project management tools can enhance the efficiency of this process.
Best Practices for Task Flow Diagrams
To maximize the potential of your task flow diagrams, consider these best practices:
- Add Decision Points: Incorporate decision points for critical parts of the project, allowing for flexibility if the project direction changes.
- Sequence Tasks Clearly: Ensure each task is sequenced logically, with a clear start and end goal. Color coding and subheadings can help clarify responsibilities.
- Include Milestones and Timelines: Mark milestones to indicate progress and boost team morale. Manage these milestones effectively to meet project deadlines.
- Keep the Diagram Clutter-Free: Maintain simplicity in the diagram’s design to avoid confusion. Additional information can be linked or provided separately.
Common Mistakes to Avoid
Avoid these pitfalls when designing task flow diagrams:
- Neglecting Key Tasks: Focus on key tasks to maintain the project’s direction and prevent delays.
- Lack of Clarity: Ensure the diagram is easy to read and understand, providing transparency for all team members.
- Ignoring Team Input: Be open to feedback from your team to address potential issues and improve the workflow.
- Skipping Review Processes: Regularly review completed tasks before moving on to the next phase to ensure quality and adherence to project goals.
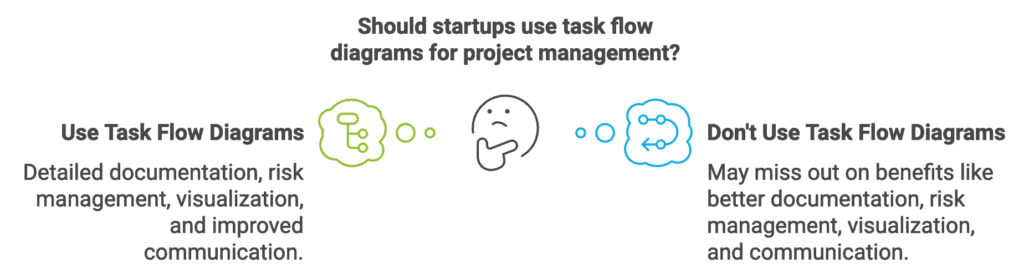
Benefits of a Task Flow Diagram
Startups can leverage task flow diagrams as a simple yet powerful tool for project management. Here are some key benefits:
- Detailed Documentation: The diagram serves as official documentation, providing a historical record of the project’s progress and execution.
- Risk Management: Identifying potential bottlenecks and issues early helps mitigate risks and avoid critical problems later.
- Visualization and Clarity: A clear visual representation aids in understanding project health and prioritizing tasks.
- Improved Communication: Task flow diagrams enhance communication among team members, ensuring tasks are completed efficiently and on schedule.
Key Takeaway
A task flow diagram is an invaluable tool for startups to create a clear, actionable roadmap for their projects. By following these steps and best practices, businesses can ensure smooth operations, effective communication, and successful project completion in 2024.